In this article I am going to implement Asp.net Core Identity with Jwt Authentication in one class library so you can use it in any project without installing any extra packages or any dependency in the main project. It is very good approach when we try to do our work by adding class libraries because in that case if you got any error you get to know very easily where the error comes and with that you have to simply create one new project with asp.net core web api and use this class library of asp.net core identity with jwt in your project by adding reference of this class library to your main project. we will also make the api for generating the refresh token so when the token expires we can generate new token.
Introduction to Asp.net core Identity
Asp.net core Identity is an api that supports login, signup, email confirmation, reset password, forgot password user interfaces. Basically it manages all the user credentials including their passwords, roles , claims and so many other things. When we use asp.net core identity in our project then automatically it will create some tables which is used to store user details , their roles , roles mappings and the user claims. For installing identity you have to install the package that is discussed below:
Microsoft.AspNetCore.Identity.EntityFrameworkCore
Introduction to JWT
JWT stands for JSON Web Token which is an used to securely transmitting information from one party to another party in the form of JSON object. This information is trusted because it is digitally signed and encrypted using HMAC algorithm. In simple words we can say that JWT is used to check the authentication and authorization of signed user. JWT provides a token which is send with the header to access the api else anyone can access our APIs and this will cause problem for us and it is the invitation for hackers. For installing JWT in our asp.net core identity with jwt class library we need to install the given package.
Microsoft.AspNetCore.Authentication.JwtBearerLets Start Coding by Creating a new project
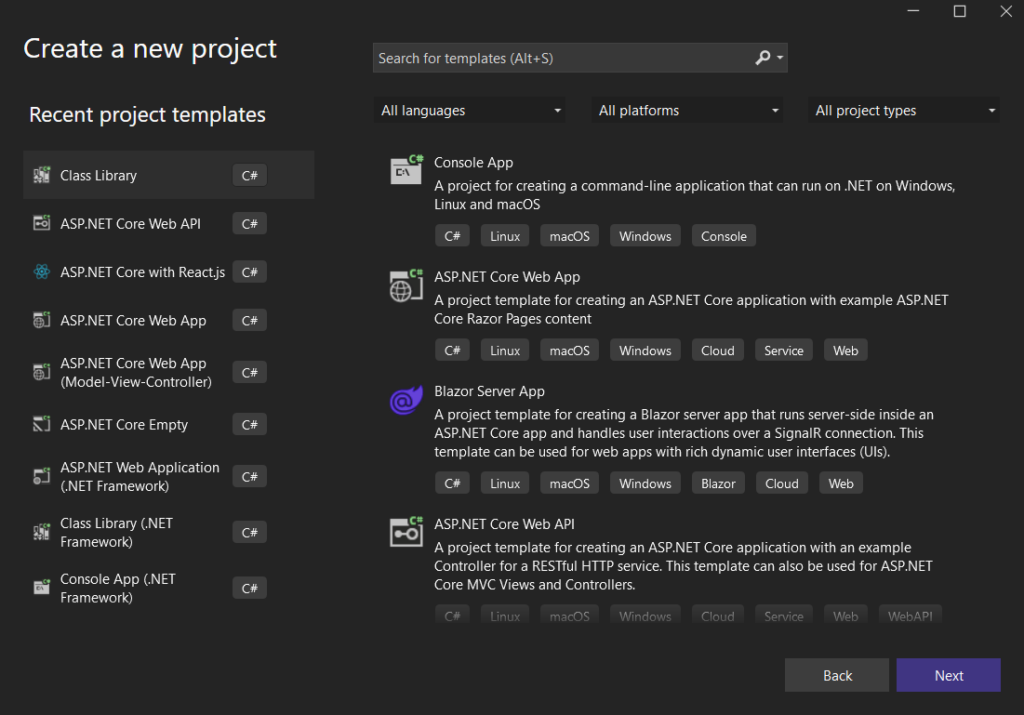
After creating new project choose ASP.NET Core Web API and select the project name and where you want to keep the project solution then make some additional settings and then click on create like given below :
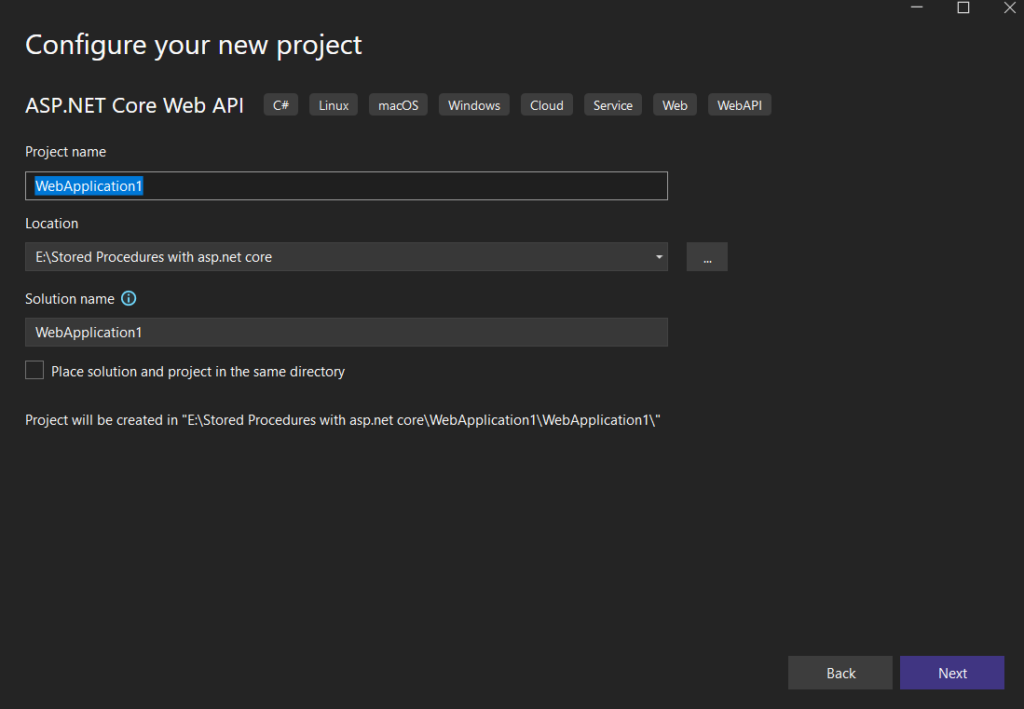
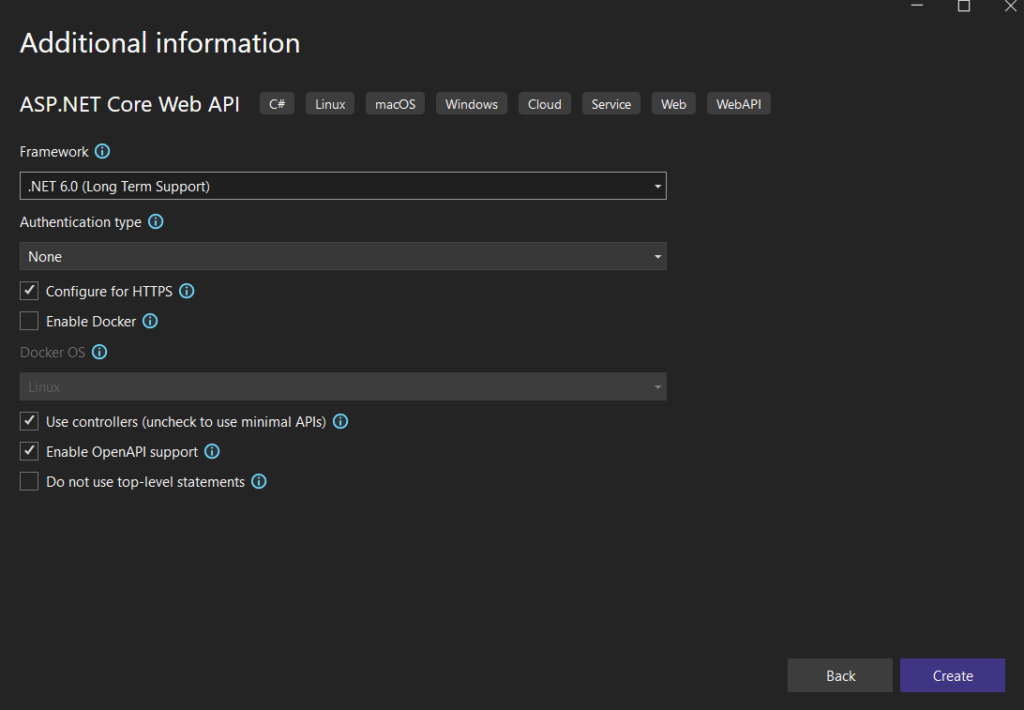
After that your project will be created and now you have to add one class library into your project solution by right click on solution ‘webApplication1’.
- Right click on solution ‘WebApplication1’
- Click on Add
- Then click on New Project
- After that you have to select class library
- Then name it anything but meaningfull name.
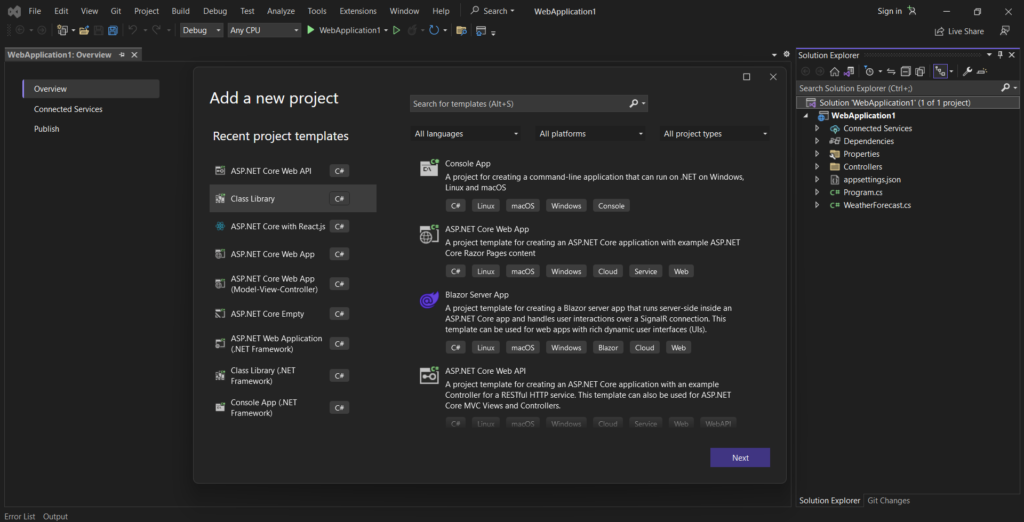
Adding Asp.net core identity with jwt authentication in class library
1. First of all install these necessary packages in your class library. As I using .NET 6.0 therefore I have installed all the packages with version of 6.0.0.
Microsoft.AspNetCore.Identity.EntityFrameworkCore
Microsoft.EntityFrameworkCore.SqlServer
Microsoft.EntityFrameworkCore.Tools
Microsoft.EntityFrameworkCore.Design
Microsoft.AspNetCore.Authentication.JwtBearer
2. Add Entities folder inside the class library and add the classes given below. The classes which is given below is the entities which is created automatically in the table when we use identity most of the times we only use IdentityUser, IdentityRole and IdentityUserRole but here I am creating class library therefore I have to modify each entity with our requirement so whenever I use this class library with our project I can access all identity tables without installing identity package.
//Application User
public class ApplicationUser:IdentityUser
   {
        public virtual ICollection<ApplicationUserClaim>? Claims { get; set; }
        public virtual ICollection<ApplicationUserLogin>? Logins { get; set; }
        public virtual ICollection<ApplicationUserToken>? Tokens { get; set; }
        public virtual ICollection<ApplicationUserRole>? UserRoles { get; set; }
        public string? RefreshToken { get; set; }
        public DateTime? RefreshTokenExpiryTime { get; set; }
   }

//Application Roles
public class ApplicationRoles:IdentityRole
    {
        public virtual ICollection<ApplicationUserRole>? UserRoles { get; set; }
        public virtual ICollection<ApplicationRoleClaim>? RoleClaims { get; set; }
    }

//Application UserRole
public class ApplicationUserRole:IdentityUserRole<string>
    {
        public virtual ApplicationUser? User { get; set; }
        public virtual ApplicationRoles? Role { get; set; }
    }

//These classes are not so important when you doing asp.net core identity with single project but here I am creating class library therefore I have added these classes.

// ApplicationUserLogin
public class ApplicationUserLogin:IdentityUserLogin<string>
    {
        public virtual ApplicationUser User { get; set; }
    }

// ApplicationUserClaim
public class ApplicationUserClaim:IdentityUserClaim<string>
    {
        public virtual ApplicationUser User { get; set; }
    }

//ApplicationUserToken
public class ApplicationUserToken:IdentityUserToken<string>
    {
        public virtual ApplicationUser User { get; set; }
    }

//ApplicationRoleClaim
public class ApplicationRoleClaim:IdentityRoleClaim<string>
    {
        public virtual ApplicationRoles? Role { get; set; }
    }
3. Then make another folder with the name of Repository which will contain all the logic of login, signup, refreshToken and all. Inside Repository folder create one interface with name ILoginRepository and one class with name of LoginRepository and add the following code inside the above.
//ILoginRepository
public interface ILoginRepository<TUser> where TUser : ApplicationUser
    {
        Task<LoginResponseViewModel> Login(LoginRequestViewModel model);
        Task<bool> SignUp(TUser model, string password);
        Task<TokenModel> RefreshToken(TokenModel model);

    }

//LoginRepository
public class LoginRepository<TUser> : ILoginRepository<TUser> where TUser : ApplicationUser
    {
        private readonly UserManager<TUser> _userManager;
        private readonly RoleManager<ApplicationRoles> _roleManager;
        private readonly IConfiguration _configuration;
        public LoginRepository(UserManager<TUser> userManager, RoleManager<ApplicationRoles> roleManager, IConfiguration configuration)
        {
            _userManager = userManager;
            _roleManager = roleManager;
            _configuration = configuration;
        }


        public async Task<LoginResponseViewModel> Login(LoginRequestViewModel model)
        {
            try
            {
                var user = await _userManager.FindByEmailAsync(model.Email);
                if (user != null && await _userManager.CheckPasswordAsync(user, model.Password))
                {
                    var userRoles = await _userManager.GetRolesAsync(user);
                    string role = userRoles.FirstOrDefault();
                    await _userManager.AddClaimAsync(user, new Claim("UserRole",    role ));
                    var authClaims = new List<Claim>
                    {
                    new Claim(ClaimTypes.Name, user.UserName),
                    new Claim(JwtRegisteredClaimNames.Jti, Guid.NewGuid().ToString()),
                    };

                    foreach (var userRole in userRoles)
                    {
                        authClaims.Add(new Claim(ClaimTypes.Role, userRole));
                    }

                    //authClaims.Add(new Claim("UserId", user.Id));
                    var authSigningKey = new SymmetricSecurityKey(Encoding.UTF8.GetBytes(_configuration["JWT:Secret"]));

                    var token = CreateToken(authClaims);
                    var refreshToken = GenerateRefreshToken();

                    _ = int.TryParse(_configuration["JWT:RefreshTokenValidityInHours"], out int RefreshTokenValidityInHours);

                    user.RefreshToken = refreshToken;
                    user.RefreshTokenExpiryTime = DateTime.Now.AddMinutes(RefreshTokenValidityInHours);

                    await _userManager.UpdateAsync(user);

                    return new LoginResponseViewModel
                    {
                        userId = user.Id,
                        Token = new JwtSecurityTokenHandler().WriteToken(token),
                        IsSuccessFul = true,
                        RefreshToken = refreshToken,
                        UserName = model.UserName,
                        Email = model.Email,
                    };
                }
                return new LoginResponseViewModel
                {
                    IsSuccessFul = false,
                };
            }
            catch (Exception ex)
            {
                throw ex;
            }

        }

        public async Task<bool> SignUp(TUser model, string password)
        {
            try
            {
                var userExist = await _userManager.FindByEmailAsync(model.Email);
                if (userExist != null)
                {
                    return false;
                }
                await _userManager.CreateAsync(model, password);
                await _userManager.AddToRoleAsync(model, "User");
                return true;
            }
            catch (Exception ex)
            {
                throw;
            }

        }

        public async Task<TokenModel> RefreshToken(TokenModel model)
        {
            if (model == null)
            {
                return new TokenModel { Message = "Invalid Request" };
            }
            var principal = GetPrincipalFromExpiredToken(model.AccessToken);
            if (principal == null)
            {
                return new TokenModel { Message = "Invalid Refresh Token or Access Token" };
            }
            string username = principal.Identity.Name;
            var user = await _userManager.FindByNameAsync(username);
            if (user == null || user.RefreshToken != model.RefreshToken || user.RefreshTokenExpiryTime <= DateTime.Now)
            {
                return new TokenModel { Message = "Invalid Refresh Token or Access Token" };
            }
            var newAccessToken = CreateToken(principal.Claims.ToList());
            var newRefreshToken = GenerateRefreshToken();

            user.RefreshToken = newRefreshToken;
            await _userManager.UpdateAsync(user);

            return new TokenModel
            {
                AccessToken = new JwtSecurityTokenHandler().WriteToken(newAccessToken),
                RefreshToken = newRefreshToken
            };
        }

        private JwtSecurityToken CreateToken(List<Claim> authClaims)
        {
            var authSigningKey = new SymmetricSecurityKey(Encoding.UTF8.GetBytes(_configuration["JWT:Secret"]));
            _ = int.TryParse(_configuration["JWT:TokenValidityInHours"], out int TokenValidityInHours);

            var token = new JwtSecurityToken(
                        issuer: _configuration["JWT:ValidIssuer"],
                        audience: _configuration["JWT:ValidAudience"],
                        expires: DateTime.Now.AddMinutes(TokenValidityInHours),
                        claims: authClaims,
                        signingCredentials: new SigningCredentials(authSigningKey, SecurityAlgorithms.HmacSha256)
                );
            return token;
        }

        private static string GenerateRefreshToken()
        {
            var randomNumber = new byte[64];
            using var rng = RandomNumberGenerator.Create();
            rng.GetBytes(randomNumber);
            return Convert.ToBase64String(randomNumber);
        }

        private ClaimsPrincipal? GetPrincipalFromExpiredToken(string? token)
        {
            var tokenValidationParameters = new TokenValidationParameters
            {
                ValidateAudience = false,
                ValidateIssuer = false,
                ValidateIssuerSigningKey = true,
                IssuerSigningKey = new SymmetricSecurityKey(Encoding.UTF8.GetBytes(_configuration["JWT:Secret"])),
                ValidateLifetime = false
            };

            var tokenHandler = new JwtSecurityTokenHandler();
            var principal = tokenHandler.ValidateToken(token, tokenValidationParameters, out SecurityToken securityToken);
            if (securityToken is not JwtSecurityToken jwtSecurityToken || !jwtSecurityToken.Header.Alg.Equals(SecurityAlgorithms.HmacSha256, StringComparison.InvariantCultureIgnoreCase))
                throw new SecurityTokenException("Invalid token");

            return principal;
        }
    }
4. Now create another folder with name of ResponseRequestModels which contains all the view models.
// LoginRequestViewModel
public class LoginRequestViewModel
    {
        public string Email { get; set; }
        public string Password { get; set; }
        public string? UserName { get; set; }
    }

// LoginResponseViewModel
public class LoginResponseViewModel
    {
        public string userId { get; set; }
        public string UserName { get; set; }
        public bool IsSuccessFul { get; set; }
        public string Token { get; set; }
        public string RefreshToken { get; set; }
        public string Email { get; set; }
        public string? Role { get; set; }
    }

// TokenModel
public class TokenModel
    {
        public string? AccessToken { get; set; }
        public string? RefreshToken { get; set; }
        public string? Message { get; set; }
    }
5. Make one more folder with name of Contract which contains the interfaces of our services that is used in this asp.net core identity with jwt class library
// IAccountService
public interface IAccountService<TUser> where TUser : ApplicationUser
    {
        Task<LoginResponseViewModel> Login(LoginRequestViewModel loginModel);
        Task<bool> SignUp(TUser signUpModel, string Password);

        Task<TokenModel> RefreshToken(TokenModel tokenModel);

    }
6. Make another folder of services which contains the implementation of Contract folder services.
// AccountService
public class AccountService<TUser> : IAccountService<TUser> where TUser : ApplicationUser
    {
        private readonly ILoginRepository<TUser> loginRepo;
        public AccountService(ILoginRepository<TUser> loginRepository)
        {
            loginRepo = loginRepository;
        }
        public async Task<LoginResponseViewModel> Login(LoginRequestViewModel loginViewModel)
        {
            try
            {
                var res = await loginRepo.Login(loginViewModel);
                return res;
            }
            catch (Exception ex)
            {
                throw;
            }
        }

        public async Task<bool> SignUp(TUser signUpModel, string password)
        {
            try
            {
                var res = await loginRepo.SignUp(signUpModel, password);
                if (res)
                {
                    return true;
                }
                return false;
            }
            catch (Exception ex)
            {
                throw;
            }
        }

        public async Task<TokenModel> RefreshToken(TokenModel model)
        {
            try
            {
                var res = await loginRepo.RefreshToken(model);
                return res;
            }
            catch (Exception ex)
            {
                throw;
            }
        }
    }
7. Make one DbContext file you can create it by creating one more folder named Data or directly create inside the root folder of class library. Here I have created the DbContext file in root folder of asp.net core identity with jwt class library and name it LoginPortalDbContext.
// I have customized the IdentityDbContext so I can use this in such a way in our project that fullfills our requirement.

public class LoginPortalDbContext<T> : IdentityDbContext<
        ApplicationUser, ApplicationRoles, string,
        ApplicationUserClaim, ApplicationUserRole, ApplicationUserLogin,
        ApplicationRoleClaim, ApplicationUserToken>
    {
        public LoginPortalDbContext(DbContextOptions options) : base(options)
        {
        }

        protected override void OnModelCreating(ModelBuilder modelBuilder)
        {
            base.OnModelCreating(modelBuilder);

            modelBuilder.Entity<ApplicationUser>(b =>
            {
                // Each User can have many UserClaims
                b.HasMany(e => e.Claims)
                    .WithOne(e => e.User)
                    .HasForeignKey(uc => uc.UserId)
                    .IsRequired();

                // Each User can have many UserLogins
                b.HasMany(e => e.Logins)
                    .WithOne(e => e.User)
                    .HasForeignKey(ul => ul.UserId)
                    .IsRequired();

                // Each User can have many UserTokens
                b.HasMany(e => e.Tokens)
                    .WithOne(e => e.User)
                    .HasForeignKey(ut => ut.UserId)
                    .IsRequired();

                // Each User can have many entries in the UserRole join table
                b.HasMany(e => e.UserRoles)
                    .WithOne(e => e.User)
                    .HasForeignKey(ur => ur.UserId)
                    .IsRequired();
            });

            modelBuilder.Entity<ApplicationRoles>(b =>
            {
                // Each Role can have many entries in the UserRole join table
                b.HasMany(e => e.UserRoles)
                    .WithOne(e => e.Role)
                    .HasForeignKey(ur => ur.RoleId)
                    .IsRequired();

                // Each Role can have many associated RoleClaims
                b.HasMany(e => e.RoleClaims)
                    .WithOne(e => e.Role)
                    .HasForeignKey(rc => rc.RoleId)
                    .IsRequired();
            });
        }
    }
8. We have created lots of things in our project but this will only work if we inject all our repositories and services in program.cs file .Net 6.0 but if you are using .Net 5.0 then you can inject all this services under the startup.cs file. But here the problem is that in class library we don’t have any program.cs file so how can we inject our services? The answer is we can inject our services by creating IService collection in our Extension file. So here is the code to implement the IService collection. For that create another file in root folder of class library and name it anything in my case I have name it LoginPortalServiceExtension.
public static class LoginPortalServiceExtension
    {
        public static IServiceCollection AddIdentityAndJwtServices<TContext, TUser>(this IServiceCollection services,
            IConfiguration configuration) where TContext : DbContext where TUser : ApplicationUser
        {
            services.AddIdentity<TUser, ApplicationRoles>()
                    .AddEntityFrameworkStores<TContext>()
                    .AddDefaultTokenProviders();

            services.AddScoped<ILoginRepository<TUser>, LoginRepository<TUser>>();
            services.AddScoped<IAccountService<TUser>, AccountService<TUser>>();

            services.AddAuthentication(options =>
            {
                options.DefaultAuthenticateScheme = JwtBearerDefaults.AuthenticationScheme;
                options.DefaultChallengeScheme = JwtBearerDefaults.AuthenticationScheme;
                options.DefaultScheme = JwtBearerDefaults.AuthenticationScheme;
            }).AddJwtBearer(x =>
            {

     x.SaveToken = true;
                x.RequireHttpsMetadata = false;
                x.TokenValidationParameters = new TokenValidationParameters()
                {
                    ValidateIssuer = true,
                    ValidateAudience = true,
                    ValidateLifetime = true,
                    ValidateIssuerSigningKey = true,
                    ClockSkew = TimeSpan.Zero,

                    ValidAudience = configuration["JWT:ValidAudience"],
                    ValidIssuer = configuration["JWT:ValidIssuer"],
                    IssuerSigningKey = new SymmetricSecurityKey(Encoding.UTF8.GetBytes(configuration["JWT:Secret"]))
                };
            });

            return services;
        }

       // This method is created to seed initial data in our table with hashed  password.
        public static void SeedUserWithHashedPassword<T>(ModelBuilder builder, T student, string password) where T : ApplicationUser
        {
            PasswordHasher<T> passwordHasher = new PasswordHasher<T>();
            var hashedPassword = passwordHasher.HashPassword(student, password);

            if (student != null)
            {
                student.PasswordHash = hashedPassword;
                builder.Entity<T>().HasData(student);
            }
        }
    }
Now we have created our asp.net core identity with jwt class library. So you can use this class library with any project if you don’t want to install identity and jwt packages in your project. This thing is going to be beneficial if we have multiple projects and we have to implement to asp.net core identity with jwt in all of our projects then you can simply import this class library and use in your project.
Lets see how we can use this Asp.net core identity with jwt authentication Class library in our project
For using this class library with our project we have to add reference of this class library with our project that is created in the before adding class library. In my case my class library name is LoginPortal and project name is TestingTheLoginPackage. So to add reference click on the project < Add< Project reference and choose your class library.
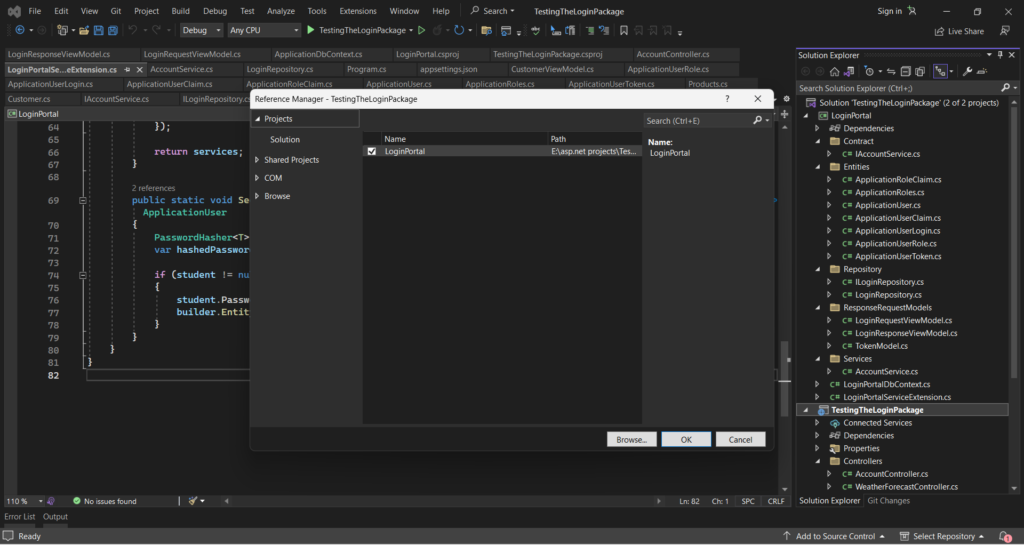
In order to use above class library in our project follow the following steps:
1. Install necessary packages in your project.
Microsoft.EntityFrameworkCore.Design
Microsoft.EntityFrameworkCore.Tools
AutoMapper
Note: we have not installed the identity and jwt packages in our project
2. Create one folder with name of Entities which includes all entities that you want in your database instead of identity tables. Instead of this if you want to customize any asp.net core identity table then you can do that by inheriting that table in your entity like :
//This entities are inside Entities folder

//This is customer which is inheriting from applicationUser
public class Customer:ApplicationUser
    {
        public string FirstName { get; set; }
        public string LastName { get; set; }
    }

//Product
public class Products
    {
        public Guid Id { get; set; }= Guid.NewGuid();
        public string ProductName { get; set; }
        public string ProductDescription { get; set; }
    }
3. Create one more folder with name of Data and inside that create one ApplicationDbContext class.
// we are inheriting our ApplicationDbContext with our class library DbContext and also seeding some users , roles and userRoles in tables.

public class ApplicationDbContext : LoginPortalDbContext<Customer>
    {
        public ApplicationDbContext(DbContextOptions<ApplicationDbContext> options) : base(options)
        {
        }

        public DbSet<Products> Products { get; set; }

        protected override void OnModelCreating(ModelBuilder builder)
        {
            base.OnModelCreating(builder);
            this.SeedUsers(builder);
            this.SeedRoles(builder);
            this.SeedUserRoles(builder);
        }
        private void SeedUsers(ModelBuilder builder)
        {


            Customer user = new Customer()
            {
                FirstName = "Raj",
                LastName="Take",
                Id = "b74ddd14-6340-4840-95c2-db12554843e5",
                UserName = "Admin",
                Email = "admin@gmail.com",
                NormalizedUserName = "Admin",
                NormalizedEmail = "admin@gmail.com",
                LockoutEnabled = false,
                PhoneNumber = "1234567890",
            };

            LoginPortalServiceExtension.SeedUserWithHashedPassword<Customer>(builder, user, "Admin@123");

            Customer user1 = new Customer()
            {
                FirstName = "User",
                LastName="Surname",
                Id = "F7A13C3E-EB62-4193-9653-CB3BB571DADF",
                UserName = "User",
                Email = "user@gmail.com",
                NormalizedUserName = "User",
                NormalizedEmail = "user@gmail.com",
                LockoutEnabled = false,
                PhoneNumber = "1234567890",
            };

            LoginPortalServiceExtension.SeedUserWithHashedPassword<Customer>(builder, user1, "User@123");
        }

        private void SeedRoles(ModelBuilder builder)
        {
            builder.Entity<ApplicationRoles>().HasData(
                new ApplicationRoles() { Id = "fab4fac1-c546-41de-aebc-a14da6895711", Name = "Admin", ConcurrencyStamp = "1", NormalizedName = "Admin" },
                new ApplicationRoles() { Id = "c7b013f0-5201-4317-abd8-c211f91b7330", Name = "User", ConcurrencyStamp = "2", NormalizedName = "User" }
                );
        }

        private void SeedUserRoles(ModelBuilder builder)
        {
            builder.Entity<ApplicationUserRole>().HasData(
              new ApplicationUserRole() { RoleId = "fab4fac1-c546-41de-aebc-a14da6895711", UserId = "b74ddd14-6340-4840-95c2-db12554843e5" },
              new ApplicationUserRole() { RoleId = "c7b013f0-5201-4317-abd8-c211f91b7330", UserId = "F7A13C3E-EB62-4193-9653-CB3BB571DADF" }
            );
        }
    }
4. Create one more folder with name of Mapping and inside that folder create one file which is CustomerMappings which contains all the mappings of your project.
public class CustomerProfile:Profile
    {
        public CustomerProfile()
        {
            CreateMap<Customer,CustomerViewModel>().ReverseMap();
        }

    }
5. Create one more folder with name of ViewModel which contains all necessary viewModels for your entities. ( It is sometime optional)
 public class CustomerViewModel:ApplicationUser
    {
        public string FirstName { get; set; }
        public string LastName { get; set; }
    }
6. Modify the appsettings.json and provide your server name and you can change your “JWT” credentials as per your choice.
{
  "Logging": {
    "LogLevel": {
      "Default": "Information",
      "Microsoft.AspNetCore": "Warning"
    }
  },
  "AllowedHosts": "*",
  "ConnectionStrings": {
    "DefaultConnection": "Server=DESKTOP-I5FNH7C;Database=TestingLoginPortalDB;Trusted_Connection=True;MultipleActiveResultSets=true"
  },
  "JWT": {
    "ValidAudience": "abcdefghija",
    "ValidIssuer": "abcdem",
    "Secret": "mikdpclabtechmsdfis",
    "TokenValidityInHours": 3,
    "RefreshTokenValidityInHours": 10
  }
}
7. Add the dependency in your program.cs
using AutoMapper;
using LoginPortal;
using Microsoft.EntityFrameworkCore;
using Microsoft.OpenApi.Models;
using TestingTheLoginPackage.Data;
using TestingTheLoginPackage.Entities;
using TestingTheLoginPackage.Mapping;

var builder = WebApplication.CreateBuilder(args);

// Add services to the container.
builder.Services.AddDbContext<ApplicationDbContext>(options =>
          options.UseSqlServer(builder.Configuration.GetConnectionString("DefaultConnection")));
builder.Services.AddIdentityAndJwtServices<ApplicationDbContext, Customer>(builder.Configuration);

var config = new MapperConfiguration(cfg =>
{
    cfg.AddProfile(new CustomerProfile());
});
var mapper=config.CreateMapper();
builder.Services.AddSingleton(mapper);

builder.Services.AddSwaggerGen(options =>
{
    options.SwaggerDoc("v1", new Microsoft.OpenApi.Models.OpenApiInfo { Title = "TestingTheLoginPortalPackage", Version = "V1" });
    options.AddSecurityDefinition("Bearer", new OpenApiSecurityScheme
    {
        In = ParameterLocation.Header,
        Name = "Authorization",
        Type = SecuritySchemeType.Http,
        BearerFormat = "JWT",
        Scheme = "Bearer",

    });
    options.AddSecurityRequirement(new OpenApiSecurityRequirement
    {
        {
            new OpenApiSecurityScheme
            {
                Reference=new OpenApiReference
                {
                    Type=ReferenceType.SecurityScheme,
                    Id="Bearer"
                }
            },
            new string[]{}
        }
    });
});
builder.Services.AddControllers();

// Learn more about configuring Swagger/OpenAPI at https://aka.ms/aspnetcore/swashbuckle
builder.Services.AddEndpointsApiExplorer();
builder.Services.AddSwaggerGen();

var app = builder.Build();

// Configure the HTTP request pipeline.
if (app.Environment.IsDevelopment())
{
    app.UseSwagger();
    app.UseSwaggerUI();
}

app.UseHttpsRedirection();
app.UseAuthentication();
app.UseAuthorization();

app.MapControllers();

app.Run();
8. Now we have add all the necessary dependency in our project now we are able to use that class library in our class library of asp.net core identity with jwt authentication. For that simply add one controller with the name of AccountController.
using AutoMapper;
using LoginPortal.Contract;
using LoginPortal.ResponseRequestModels;
using Microsoft.AspNetCore.Authorization;
using Microsoft.AspNetCore.Mvc;
using TestingTheLoginPackage.Entities;
using TestingTheLoginPackage.ViewModel;

namespace TestingTheLoginPackage.Controllers
{
[Route("api/[controller]")]
[ApiController]
public class AccountController : ControllerBase
{
private readonly IAccountService _accountService;
private readonly IMapper _mapper;
public AccountController(IAccountService accountService, IMapper mapper)
{
_accountService = accountService;
_mapper = mapper;
}

    [HttpPost("Login")]
    public async Task<IActionResult> Login(LoginRequestViewModel model)
    {
        try
        {
            var result = await _accountService.Login(model);
            if (result.IsSuccessFul == true)
            {
                return Ok(result);
            }
            else
            {
                return BadRequest("Not Found");
            }
        }
        catch (Exception ex)
        {
            return BadRequest(ex.Message);
        }
    }

    [HttpPost("Signup")]
    public async Task<IActionResult> SignUp(Employee model)
    {
        try
        {
           var result = await _accountService.SignUp(model,model.PasswordHash);
            return Ok("User Created SuccessFully");
        }
        catch (Exception ex)
        {
            return BadRequest(ex.Message);
        }
    }

    [HttpPost("RefreshToken")]
    public async Task<IActionResult> RefreshToken(TokenModel model)
    {
        try
        {
            var result = await _accountService.RefreshToken(model);
            if (result.RefreshToken != null && result.AccessToken != null)
            {
                return Ok(result);
            }
            return BadRequest("Unable to Refresh");
        }
        catch (Exception ex)
        {
            return BadRequest(ex.Message);
        }
    }
}

}
9. Now run your project and start testing your project.
Notes:-
- Always wrap your code inside try catch block which is really good practice.
- In this project I have discussed how we can generate token and refresh token to secure our website.
- With jwt token only authenticated user will be able to access our website or web application.
- Now you can start implementing your own project or class library by following this article.
Conclusion
Above is the whole code and explaination of how to implement asp.net core identity with jwt authentication in the class library or in separate project so you can use this class library in your project by adding the namespace and without installing the asp.net core identity and jwt authentication packages.